Showing posts with label Tutorial. Show all posts

Friday, 26 February 2016

Best camera settings for astrophotography | Digital Camera World

Dip your toes into Astrophotography with this quick guide to the most important camera settings ...


Our series of pre-shot checklists continues with a look at the best camera settings for astrophotography.

Source: Best camera settings for astrophotography | Digital Camera World

Friday, 19 February 2016

Daily Tips | How To Photograph and Retouch a Sunset

If you photograph a lot of sunsets (who doesn't?) then you'll find this tutorial by Serge Ramelli invaluable. He has a way of squeezing every ounce of colour from a shot. Enjoy!


In this article I am going to discuss more techniques and settings to get a great looking sunset panorama.

Source: Daily Tips | How To Photograph and Retouch a Sunset

Friday, 12 February 2016

Quick Edit Luminosity Masking Panel

If you use Photoshop a lot to blend exposures and/or brackets then youve probably heard of Luminosity Masking and you probably know what a pain it is to create the masks manually every time. This panel (PS CS6+) will allow you to do that quickly. That's it.


Source: Quick Edit Luminosity Masking Panel

Friday, 5 February 2016

Hyperfocal focusing: how to calculate the best distance to focus at |Digital Camera World

If you're obsessed with critical sharpness in your shots from front to back, usually the landscape photographers, then it would be worth your while to read up on Hyperfocal Focusing. Whilst not the only method to achieve sharpness it is certainly one that cannot be ignored and is well worth having in your arsenal.


In this tutorial we answer all of the common questions photographers have about hyperfocal focusing and how to calculate the best distance.

Source: Hyperfocal focusing: how to calculate the best distance to focus at | Digital Camera World

Friday, 29 January 2016

A Natural Light Tip That Will Have Strobists Selling Their Lights |Fstoppers


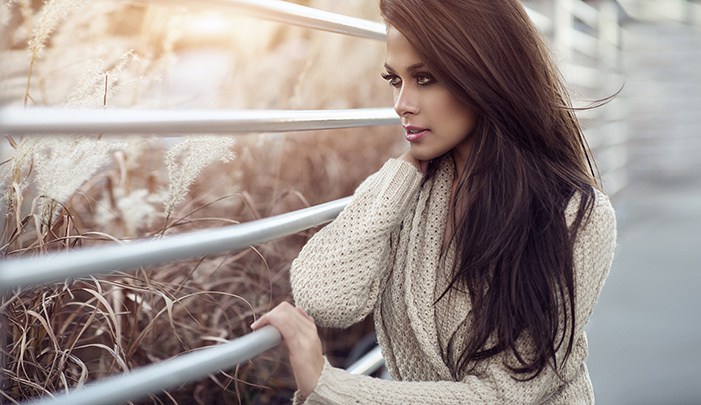
One of the most noticeable differences between portraits taken outside using natural light as opposed to artificial light is the background. Images using artificial light tend to have darker backgrounds. This is crucial in catching the eye of the viewer and allows him or her to focus on the subject. This article is a guide in achieving this look using natural light only.

Source: A Natural Light Tip That Will Have Strobists Selling Their Lights | Fstoppers

Friday, 22 January 2016

A Complete Guide to Retouching Portraits in Photoshop for Free |Fstoppers


There is an innumerable amount of articles and tutorials teaching parts and pieces of retouching portraits. However, finding the ones with quality techniques and information can take days. Furthermore, there is no singular tutorial that teaches a complete set of methods to retouch portraits free of charge. Finding the right tutorials for each aspect of editing can become very time consuming. This article contains 5 years of research for achieving the greatest methods to retouch a portrait.

Source: A Complete Guide to Retouching Portraits in Photoshop for Free | Fstoppers

Friday, 8 January 2016

Brenizer Method: how to shoot and stitch a bokeh panorama | DigitalCamera World

Following an earlier article on rocking the Brenizer Method, here's an article on stitching together the results.


What is the Brenizer Method? In this tutorial we show you how to shoot and stitch a bokeh panorama to achieve a shallow depth of field.

Source: Brenizer Method: how to shoot and stitch a bokeh panorama | Digital Camera World

Friday, 1 January 2016

How to retouch photos: pro techniques in 10 easy steps | Digital CameraWorld

More of a basic beginning for newbie retouchers, don't like blurring the skin myself bit it's a place to start ...

(keep a watch for our intermediate/advanced techniques)


Learn how to retouch photos using the Free Transform and Liquify tools in Photoshop, as well as how to clean up skin with the Healing Brush and Clone Stamp.

Source: How to retouch photos: pro techniques in 10 easy steps | Digital Camera World

Friday, 25 December 2015

Mastering the Exposure Triangle for Newbies


When I first got my digital camera, words like Aperture and ISO were foreign to me, and it took me a couple of weeks of reading and studying a lot before the lightbulb turned on in my head. You might be feeling a little confused, and you may even feel like you will never get your camera […]

Source: Mastering the Exposure Triangle for Newbies

Friday, 18 December 2015

TUTORIALS - FINE ART BLACK AND WHITE PHOTOGRAPHY - (en)VISIONOGRAPHY -Black and White Fine Art Photography | Julia Anna Gospodarou


You will find here a selection of my essential guides and tutorials - fine art black and white photography, (en)Visionography, architectural photography, long exposure photography, and my original black and white processing method Photography Drawing (PhtD) that introduces a new way of seeing and working with light and shapes, a new way of processing black and white photographs, based on techniques that are used in art and in classical artistic drawing. This space will be constantly updated and enriched, so keep an eye on it for new tutorials and useful tips and tricks for fine art photography.

Source: TUTORIALS - FINE ART BLACK AND WHITE PHOTOGRAPHY - (en)VISIONOGRAPHY - Black and White Fine Art Photography | Julia Anna Gospodarou

Friday, 11 December 2015

5 Steps to Rock the Brenizer Method


What is the Brenizer Method? The Brenizer Method is named after wedding photographer, Ryan Brenizer. He invented the method (but didn’t name it) and made it popular by using it with his wedding clients, and teaching others how to do it as well. For those who have been around photography for a while, you will […]

Source: 5 Steps to Rock the Brenizer Method

Thursday, 16 April 2015

Tutorial - Expose To The Right (ETTR)

At wilson photographics we sometimes use a technique know as ETTR or Expose To The Right when shooting landscapes and seascapes in Northumberland. You may have heard this term and wondered what it was ..... read on, dear reader, read on ....

As with all my articles I will keep it simple and adopt a "just gimme the facts" approach, only introducing as little brain-melt as possible.

The Problem ...


A common held philosophy followed by photographers for a long time has been the technique of setting your exposure for the highlights in your scene and taking an, effectively, underexposed shot with a view to raising the shadows later in post-processing to reveal the detail in those areas. The main problem with this technique is, due to the lack of information in the shadow areas of the image, increasing the exposure to recover these areas will introduce noise into the shadow areas resulting in a poor end-image.

I'll try to explain ...

ETTR - Background info ...


The recording of the scene by the photo-cells on your cameras sensor depends on the sensors linear response to the light striking it. Generally speaking, it is not a linear response so if your camera's sensor has a dynamic range of, say, 5 stops then the brightest stop (at the far right of the histogram) will record one half of the available tonal values, the next stop down will record one half of the remaining tonal values, and so on, halving all the way to the darkest stop (at the far left of the histogram). This explains the halving or doubling of light entering the camera when you stop-down or stop-up.

ETTR - The Skinny ...


This may seem somewhat complex to take in so, in a nutshell, just accept that much more information is recorded at the far right of the histogram than at the far left. You can always read up why at a later date (if you need to).

So, to follow on from that little bombshell, it would seem common sense that, in order to record the maximum possible information about a scene to produce the best possible image you would do well to overexpose the image with a view to lowering the exposure later in post-processing. This is, indeed, a valid technique - welcome to ETTR.

The below image, of a chain in a harbour somewhere in Northumberland, was taken using ettr ...


[caption id="attachment_1335" align="aligncenter" width="300"]ETTR Before Processing ETTR Before Processing[/caption]

... the histogram clearly show an over-exposed image, but with adjustment to exposure, contrast and saturation in post-processing it can be recovered ...

[caption id="attachment_1336" align="aligncenter" width="300"]ETTR After Processing ETTR After Processing[/caption]

... the histogram now shows a much more balanced image with detail covering the full range of tonal values.

Importantly no noise was introduced into the shadow areas, which would almost certainly have been the case if the shot had been under-exposed and then lightened in post.

All-in-all, ettr is a valuable technique to have in your arsenal (just to be clear, you may still have to use filters if the range of the scene is too great). It will take a little practice and experimentation to work out how much your equipment will let you get away with because, bear in mind, the histogram you see is not based based on the RAW file but is based on an in-camera jpeg representation of the RAW file. With this in mind your histogram may show a little clipping when that is not the case, you will need to try a few images to work this out for your own gear.

It took a few test images to work out how far we could push our own gear, when out shooting landscapes and seascapes in Northumberland, and we found we could allow the histogram to venture out of the top stop a little before it affected the end result.

ETTR - The Caveats ...


  • You must shoot in RAW, to enable you to get the best results from post-processing later.

  • You cannot allow the shot to leave the right hand side of the histogram, this would result in lost information and clipping, the skill is in exposing as far right as your particular camera will allow without clipping.


Relevant Links ...

Wikipedia - http://en.wikipedia.org/wiki/Exposing_to_the_right


Wednesday, 8 October 2014

500px ISO » Unbelievable Photography » 15 Tips For Getting Razor Sharp Photos


Jimmy Mcintyre is a travel photographer, educator, and 500px ISO contributor. His photos have been published in local and national magazines, including the BBC. His online courses on digital blending and post-processing can be found in his official website. You can also check out the rest of his tutorials on 500px ISO here. In this tutorial, Jimmy shares his expert tips for capturing tack sharp photographs in-camera and in post-processing. Read on!

via 500px ISO » Unbelievable Photography » 15 Tips For Getting Razor Sharp Photos.