Saturday, 17 December 2016
Thursday, 15 December 2016
Wednesday, 14 December 2016
Tuesday, 13 December 2016
Monday, 12 December 2016
Tuesday, 6 December 2016
Check out Serge Ramelli's Youtube channel!
Check out Serge Ramelli's Youtube channel!
He has over 400 tutorials on photography, he is the number channel on
Lightroom worldwide. If you want great tricks and tips photography check him,
out!
Saturday, 1 October 2016
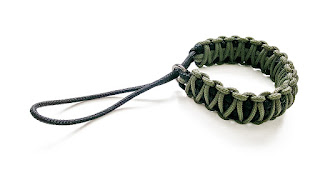
TogBitz Skinny Strap
Following the launch of our TogBitz Fat Strap we've had a mountain of requests for a product just as resilient but not as ..... erm ..... "chunky" :-D
Well, here it is, the "TogBitz Skinny Strap"
The spiel .....
Made from one continuous length of paracord, the TogBitz Skinny Strap is the ultimate way to tether your prized camera to your wrist while you concentrate on getting the shot.
Suitable for cameras from compact to professional DSLR level, the TogBitz Skinny Strap will free you from worrying about the security of your expensive photographic equipment whilst shooting.
Decorative and ruggedly stylish the two-colour TogBitz Skinny Strap is handmade to order and is also available in many two-colour combinations (just ask).
Buy the TogBitz Skinny Strap on ebay
Friday, 30 September 2016
TogBitz Fat Strap
 |
| TogBitz Fat Strap |
Buy the TogBitz Fat Strap on ebay
Having been a photographer for quite a few years now I have distilled my necessary kit down from a full setup of heavy DSLR (complete with a full set of L series Canon lenses, an innumerable collection of accessories and filters and rock-solid aluminium tripod) down to a mirrorless Sony A7R with legacy prime Canon lenses and a 3-Legged Thing carbon fibre tripod.
Believe me the change is unbelievable! I often forget I'm wearing the kit, such is the difference in weight!
That said there was always something still bugging me and I finally put my finger on it .....
..... the camera strap.
My situation, I feel, will be common enough, I'm an active photographer and am always climbing something or other and the camera was always swinging round my neck, perilously close to rocks and other hazards. When the camera was out of the bag the neck strap was always flapping around and getting in the way.
Hence was born the "Togbitz Fat Strap"!
 | ||
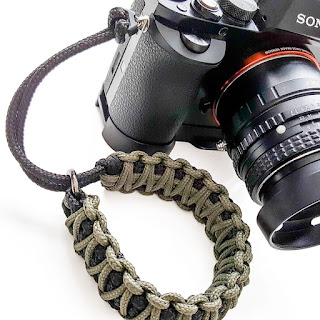
| TogBitz Fat Strap fitted to Sony A7R |
As always, I've been asked to provide a couple of the straps to interested parties I've met whilst out shooting and such was the response that I've decided to offer them as a product.
The spiel .....
Do you need a more substantial wrist strap for your camera? With a core made from one continuous length of paracord, the TogBitz Fat Strap is the ultimate way to tether your prized camera to your wrist while you concentrate on getting the shot.
Suitable for cameras from compact to professional DSLR level, the TogBitz Fat Strap will free you from worrying about the security of your expensive photographic equipment whilst shooting.
Decorative and ruggedly stylish the two-colour TogBitz Fat Strap is handmade to order and is also available in many two-colour combinations (just ask).
Buy the TogBitz Fat Strap on ebay
Friday, 26 February 2016
Best camera settings for astrophotography | Digital Camera World
Dip your toes into Astrophotography with this quick guide to the most important camera settings ...
Source: Best camera settings for astrophotography | Digital Camera World
Friday, 19 February 2016
Daily Tips | How To Photograph and Retouch a Sunset
If you photograph a lot of sunsets (who doesn't?) then you'll find this tutorial by Serge Ramelli invaluable. He has a way of squeezing every ounce of colour from a shot. Enjoy!
In this article I am going to discuss more techniques and settings to get a great looking sunset panorama.
Source: Daily Tips | How To Photograph and Retouch a Sunset
Friday, 12 February 2016
Quick Edit Luminosity Masking Panel
If you use Photoshop a lot to blend exposures and/or brackets then youve probably heard of Luminosity Masking and you probably know what a pain it is to create the masks manually every time. This panel (PS CS6+) will allow you to do that quickly. That's it.

Source: Quick Edit Luminosity Masking Panel

Source: Quick Edit Luminosity Masking Panel
Friday, 5 February 2016
How to get to - Roughting Linn, Northumberland

Following publication of our " Roughting Linn II " image we've had many requests asking "How do I get to Roughting Linn".
Google Maps seems to show the wrong location, some 5 miles off, so we've put together this short post to get you there. It's somewhat hard to describe once you leave the B roads but here we go ....
(as always there are many alternate routes)
Roughting Linn - How to get there ...
- Head into Northumberland and get onto the B6525 Northbound at Doddington, after approx 10-12 Kilometres you'll come to a crossroads with a white house on the right, turn left. Go to (3)
- Alternatively get on to the A1 North and exit onto the B6353 for Fenwick, proceed through Fenwick and Lowick, when you pass the entrance to the Barmoor Castle Country Park, stay on the road and will change to the B6525. I around 400m pass a farm on the right, a further 400m should bring you to a crossroads with a white house on the left, turn right.
- You REALLY need to refer to the Google map below here.
- Proceed down this road until you pass a large wood on the right, then it is present on both sides. When the wood on the left disappears you will be at a crossroads (in the centre of the Google map below), turn left and there is space here to park several cars on the verge.
- Walk back to the crossroads, cross to the other side and proceed down the track for around 50 metres where you should find a small track heading off to the left, if you can hear the waterfall you've gone too far.
- Follow this track down into the gulley and round to the right, like a horseshoe, and you should come to the burn.
- Follow the burn to the waterfall.
- Bingo
** As always, be careful as it is a track and not a footpath, the rocks can be slippery and if it's been raining a lot then the falls could be in full spate.
N.B. While you're there you can take a look at the Neolithic rock art. Back up to the track, cross over and look for the flat rocky area.
Map ...
That was the way we did it.
Relevant Links
Roughting Linn Rock Art
Hyperfocal focusing: how to calculate the best distance to focus at |Digital Camera World
If you're obsessed with critical sharpness in your shots from front to back, usually the landscape photographers, then it would be worth your while to read up on Hyperfocal Focusing. Whilst not the only method to achieve sharpness it is certainly one that cannot be ignored and is well worth having in your arsenal.
In this tutorial we answer all of the common questions photographers have about hyperfocal focusing and how to calculate the best distance.
Source: Hyperfocal focusing: how to calculate the best distance to focus at | Digital Camera World
Friday, 29 January 2016
A Natural Light Tip That Will Have Strobists Selling Their Lights |Fstoppers
One of the most noticeable differences between portraits taken outside using natural light as opposed to artificial light is the background. Images using artificial light tend to have darker backgrounds. This is crucial in catching the eye of the viewer and allows him or her to focus on the subject. This article is a guide in achieving this look using natural light only.
Source: A Natural Light Tip That Will Have Strobists Selling Their Lights | Fstoppers
Friday, 22 January 2016
A Complete Guide to Retouching Portraits in Photoshop for Free |Fstoppers
There is an innumerable amount of articles and tutorials teaching parts and pieces of retouching portraits. However, finding the ones with quality techniques and information can take days. Furthermore, there is no singular tutorial that teaches a complete set of methods to retouch portraits free of charge. Finding the right tutorials for each aspect of editing can become very time consuming. This article contains 5 years of research for achieving the greatest methods to retouch a portrait.
Source: A Complete Guide to Retouching Portraits in Photoshop for Free | Fstoppers
Saturday, 16 January 2016
Lake District Landscapes - Sibling Guardians
Sibling Guardians
#BrothersWater in the #LakeDistrict can be so beautiful.
An Honour Guard of trees protects a small islet against all who would invade.
Wet feet weren't strictly necessary here but I had to cut out the shore so in I went. :-)
Dorothy Wordsworth, having left William sitting on Cow Bridge, walked beside the lake on the 16th of April 1802, delighted with ‘...the boughs of the bare old trees, the simplicity of the mountains, and the exquisite beauty of the path...the gentle flowing of the stream, the glittering, lively lake, green fields without a living creature to be seen on them.’
Get out there and Discover the Lake District!
Thanks for looking in, please feel free to like/share, always appreciated.
Keith.
#getoutdoors #loveoutdoors #greatoutdoors #lakedistrict #discoverthelakedistrict
Friday, 15 January 2016
Mountainsmith Blog | How to shoot the Milky Way In 4 steps for DSLR
A few basics to get you started in Astrophotography. Milky Way to begin with ...
Source: Mountainsmith Blog | How to shoot the Milky Way In 4 steps for DSLR
Source: Mountainsmith Blog | How to shoot the Milky Way In 4 steps for DSLR
Friday, 8 January 2016
Brenizer Method: how to shoot and stitch a bokeh panorama | DigitalCamera World
Following an earlier article on rocking the Brenizer Method, here's an article on stitching together the results.
What is the Brenizer Method? In this tutorial we show you how to shoot and stitch a bokeh panorama to achieve a shallow depth of field.
Source: Brenizer Method: how to shoot and stitch a bokeh panorama | Digital Camera World
Friday, 1 January 2016
How to retouch photos: pro techniques in 10 easy steps | Digital CameraWorld
More of a basic beginning for newbie retouchers, don't like blurring the skin myself bit it's a place to start ...
(keep a watch for our intermediate/advanced techniques)
Learn how to retouch photos using the Free Transform and Liquify tools in Photoshop, as well as how to clean up skin with the Healing Brush and Clone Stamp.
Source: How to retouch photos: pro techniques in 10 easy steps | Digital Camera World
Subscribe to:
Comments (Atom)


